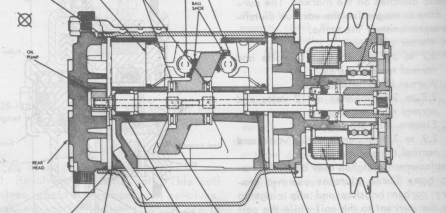
Harrison/Frigidaire A6 air conditioning compressor
Harrison A6 overhaul.
Hello all happy hobbymechanics!
This site will explain how to replace the sealings in a leaky compressor the amateur way. I'm not a pro, so I may be wrong here and there. If your compressor is worth at lot for you, then let an authorized mechanic fix yours. This is a site is for people like me, happy amateurs who like to fix things on our own ,and for eventually saving some money.
However, if your compressor make loud mechanical noises, I recommand you to find another one at the local junkyard instead of tryng to fix the one you have, which will probably be expensive.
The Harrison Frigidaire AC compressor is a real stone crusher. Big, powerful, reliable but very very hevy. It's twice as heavy as a Sanden compressor with the same capacity. But when you have a car like mine, a Cadillac 77, then one kilo more or less doesn't matter.
It is probably possible to kill elephants with it, but don't try that at home.
The A6 was born inte middle of the sixties, and could be found in GM cars for the whole seventies.
I was converting my system to R134a refrigerant when I discovered that the compressor was leaking a lot, therefore I had to replace all sealings that could be found in it. I bought at sealing kit , includind the shaft sealing. It cost me about $25 here in sweden. Practically any shop in the AC business will know where to get parts for it.
Before you even start, you must have that sealing kit, and a puller. That puller must be used to pull the pulley from the shaft. Look at the front of the compressor, in the center there is a nut, and arund that nut theres is an inward thread. The puller must fit in that thread and have a center screw that will push the shaft.
I didn't have a puller with the right thread, just almost. I had a metric puller that was designed to pull flywheels of a moped, but I made it to fit two turns, and that was enough! I told you I wasn't a pro..
The thread to use with the puller.
Other tools you must have (except all wrenches and stuff that can be found
in almost every workshop) is two snap ring pliers. One internal and one external. A plier with changeble jaws can't be used, as they are not thin enough. You also need some new refrigerant oil, as the sealings must be lubricated at installation.
What's also nice to have is a fairly clean workbench with a attached vise.
A compressed air system is always nice to have. A radio with some good music too, and of course some coffee.
If you have annoying kids, then send them to a Russian coal mine for a while.
The first thing to do is to drain the oil sump from oil. There's a plug in the bottom for that purpose. Turn the compressor by hand a couple of turns too, it will probably spit out some oil in the rear. This will prevent the oil from pouring out onto your trousers later, making you say bad things.
Measure and record how much oil that's in it.
Then remove the pulley center nut. (9/16) You may also use a big monkey wrench to prevent the pulley head from moving (don't squeeze too hard). Then remove the snap ring (if any) and pick out the washer. Then it's puller-time!
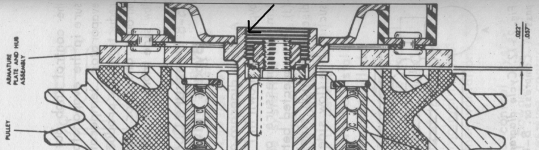
When the head is pulled off, dont drop the shaft key. In my case it remained in the head shaft hole.
The head, shaft , key and sealing.
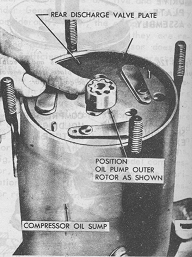
Now we can enter the rear of the compressor. Remove the four big nuts, and remove the rear head. Watch the little oil pump (cute eh?), (a gear and its housing). Remove it. Now you can also remove the big rubber o-ring that seals the whole rear plate. Then remove the rear valve plate and the very thin valve metal sheet. By now you should see the three pistons.
Compressor rear end.
And here comes the most important thing, this thing was not described in any of the manuals I have. Before pulling out the whole compressor content from its shell, you must pull out the oil pickup tube!! Use a sharp plier, or maybe try to pick it up by using a drill that fits in it. When it's out, then you can easy pull out the compressor content. And it's heavy!
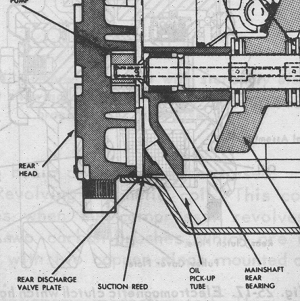
Oil pickup tube
In the front of the compressor, there is a valve plate and a thin valve metal sheet. Just like in the rear. In front of them there shuld be another of these big o-rings. Pick all out.
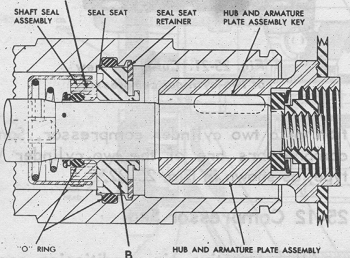
Now when the shaft is gone it's a great oppurtunity to remove the shaft sealing. Look at the "The head, shaft , key and sealing"-picture a bit above. Remove the "steel seat retainer" (that's a snap ring). And then it's possible to push out the sealing (two parts) using a long screwdriver from inside. The tricky part is to get out the o-ring that surrounds the white ceramic part. It can be found in a groove, and it's difficult to see. I took a welding stick, bent the end 90 degrees and sharpened it. Now i could cut the o-ring out with it.
Now we are half done. Congratulations! Take a cup of coffee or something. Write a letter to your kids i Russia.
Continue to part two.